
Free · runs in your browser

How to darken a video on iPhone

Two ways that need no extra app: the Adjust sliders in Photos, or this page in Safari for highlight recovery and a before and after split.

Drop a video to darkenChoose a video to darken

Or choose one from your computer to begin.Pick the over-bright clip from your photos or files.

Works with MP4MOVWebMMKVand more

Stays on your device.

To darken a video on iPhone, open it in Photos, tap the Edit button, tap Adjust and drag Exposure to the left. Then lower Highlights if a sky or window is glaring, and raise Black Point if the picture looks grey. Tap Done. The edit applies to the whole clip, and you can undo it any time with Revert to Original.

Photos is quick, but it judges by eye and shows one version at a time. If you want an automatic correction that measures the clip, a split before and after view and a readout of how much of the frame is blown out, open this page in Safari and use the tool at the top. It runs on the phone itself; the video is not uploaded.
Darken a video in the iPhone Photos app

  1. Open the video and tap Edit

    Find the clip in Photos, open it and tap the Edit button at the bottom of the screen (it is shown as an icon on recent versions of iOS).

  2. Tap Adjust and choose Exposure

    Tap Adjust, then swipe along the row of controls under the video. Tap Exposure and drag its dial to the left until the picture stops glaring.

  3. Bring back the highlights and the blacks

    Tap Highlights and drag it left to calm a bright sky. Tap Black Point and drag it right so the darkest parts look properly dark again.

  4. Compare, then tap Done

    Tap the video to flick between your edit and the original. Tap Done to save. Photos keeps the original, so Revert to Original undoes it later.

Which Photos sliders darken a video

The Adjust row in Photos holds more than a dozen light and colour controls. These are the ones that matter for an over-bright clip, with what each one does to the tones:

  • Exposure scales the whole picture, like letting in less light. The main control for a clip that is bright all over.
  • Highlights works only on the brightest tones. Use it for skies, windows and lamps.
  • Brilliance brightens shadows and calms highlights at the same time. Moving it left does the reverse, so it rarely helps here.
  • Brightness lifts or lowers the middle tones. Useful after Exposure if faces still look too light.
  • Black Point sets where black begins. Raising it deepens the shadows of a washed-out clip.
  • Contrast spreads tones apart. A small increase helps a pale video look less flat.

Each slider runs from −100 to +100 and starts at zero. Small moves go a long way; two or three controls at around −20 to −40 usually look better than one pushed to the end.

Darken a video on iPhone in Safari

The tool on this page works in Safari on iPhone and iPad. It’s worth using when the Photos sliders aren’t enough, for example when a sky needs pulling back without darkening the people in front of it.

  1. Open darken.video in Safari and tap Choose a video to darken. Pick the clip from your photo library.
  2. Tap Auto fix. The tool samples frames from the clip and sets a correction. Try Blown-out sky if the sky is the problem.
  3. Tap Split under Compare and drag the divider to check before and after.
  4. Tap Export video, then Share and Save Video to put the result in Photos. Download video saves it to Files instead.

The result is a new video; the original in your library stays as it was. For a deeper look at what the controls do, see how to fix an overexposed video.

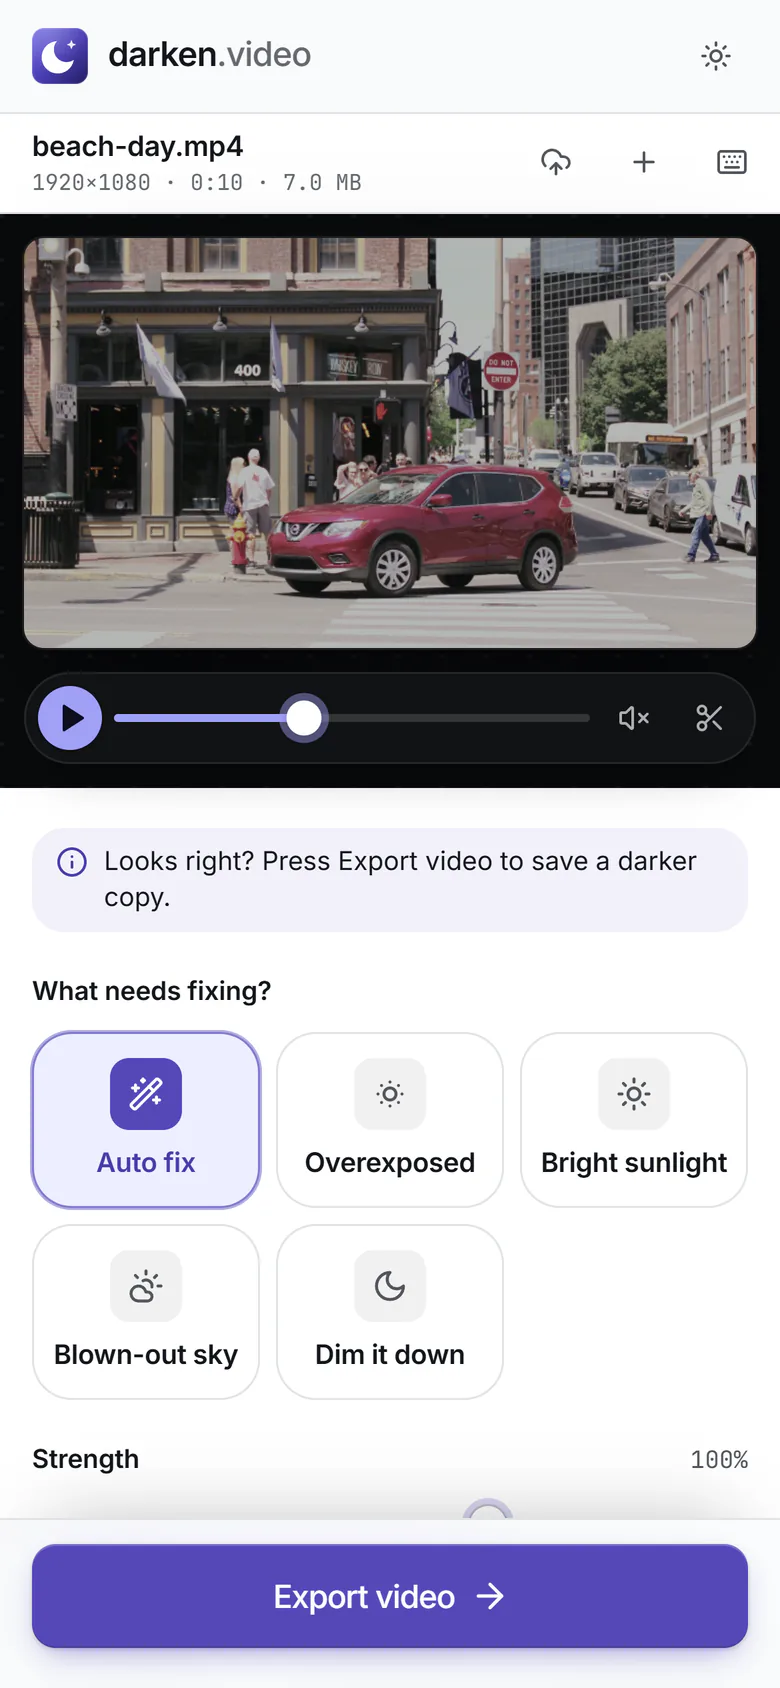
darken.video at phone size: the darkened street clip at the top with a play bar, the hint "Looks right? Press Export video to save a darker copy.", the What needs fixing? tiles with Auto fix selected, and the Export video button fixed to the bottom of the screen. (enlarge image)

The tool at phone size after Auto fix. Export video stays at the bottom of the screen.

iPhone HDR video and brightness

Recent iPhones record HDR video (Dolby Vision) by default. On the iPhone’s own screen these clips are deliberately brighter than everything around them, which is why a clip can look dazzling in Photos and normal when you send it to someone with an older phone or a laptop.

  • If the clip only looks too bright on your iPhone, lower the screen brightness or check it on another device before editing.
  • If you edit an HDR clip in Photos, check the result on a non-HDR screen too, because the two can look quite different.
  • Saving a copy with the tool on this page converts it to standard range (SDR), which looks the same everywhere.
  • To record in standard range in future, go to Settings → Camera → Record Video and turn off HDR Video.

Darkening iPhone videos: questions

Does editing a video in Photos change the original?

Not permanently. Photos stores the edit alongside the original, so you can open the clip, tap the Edit button and choose Revert to Original at any time. With iCloud Photos the edit appears on your other devices too.

Can I darken just part of a video on iPhone?

Photos applies adjustments to the whole clip. You can trim the clip first and darken what you keep, or use the trim control in the tool on this page.

Why does my darkened iPhone video look different on Windows?

It is probably HDR, and the Windows app is showing it without proper tone mapping. Save a standard-range copy with the tool on this page and it will look the same on both.

Which slider fixes a white sky in an iPhone video?

Highlights. Drag it left. If the sky is pure white it has no detail left, and darkening it will only make it grey, so stop when it starts looking flat.

Is there a free app to darken videos on iPhone?

Photos and iMovie are free and already on most iPhones. You can also use this page in Safari, which needs no app and doesn’t upload the video.